[[TOC]]
异步JavaScript
JavaScript Timeouts 和 intervals
setTimeout()
setTimeout()在指定的时间后执行一段特定的代码。
示例:
function sayHi(who){
    alert('Hello, '+who+' welcome join!');
}

let greeting = setTimeout(sayHi, 5000, 'Qijie');
使用clearTimeout()来取消上面的超时。
clearTimeout(greeting);
setInterval()
setInterval()每隔一段时间执行一段特定的代码。
示例:
function displayTime(){
    let date = new Date();
    let time = date.toLocaleTimeString();
    document.getElementById('divDate').textContent = time;
}

let setTime = setInterval(displayTime, 2000);
使用clearInterval()来清除intervals。
clearInterval(setTime);
可以使用递归setTimeout()实现每隔100毫米执行一次函数:
let i = 1;
setTimeout(function run(){
    console.log(i);
    i++;
    setTimeout(run, 100);
}, 100);
那么, setTimeout()和setInterval()有什么不同吗? setTimeout()保证了每次等待的时间间隔相同。不管执行函数的时间长短,每次间隔都是100毫秒。
而使用setInterval()时,间隔时间包含了执行代码所花费的时间。假设执行代码需要40毫秒, 那么最终间隔只有60毫秒。
requestAnimationFrame()
requestAnimationFrame() 是一个专门的循环函数,旨在浏览器中高效运行动画。
我们没有为requestAnimationFrame()指定时间间隔;它只是在当前条件下尽可能快速平稳地运行它。如果动画由于某些原因而处于屏幕外浏览器也不会浪费时间运行它。
示例
//requestAnimationFrame

const spinner = document.querySelector('#spinner');
let rotateCount = 0;
let rAF;
let startTime = null;
let isRunning = true;

function draw(timestamp){
    if(!startTime)
    {
        startTime = timestamp;
    }

    rotateCount = (timestamp - startTime)/3;
    if(rotateCount > 359)
    {
        rotateCount=rotateCount%360;
    }

    spinner.style.transform = `rotate(${rotateCount}deg)`;
    rAF = requestAnimationFrame(draw);
    isRunning = true;
}

draw();


document.querySelector('body').addEventListener('click', function(){
    if(isRunning)
    {
        cancelAnimationFrame(rAF);
        isRunning = false;
    }
    else{
        draw();
    }
})
使用Async callbacks(回调函数)实现异步请求
callback示例
使用回调函数获取网上图片资源,并显示在页面中。
let imgUrl = "https://www.collinsdictionary.com/images/full/apple_158989157.jpg";

function loadAsset(url, type, callback){
    let xhr = new XMLHttpRequest();
    xhr.open('GET', url);
    xhr.responseType = type;
    xhr.onload = function(){
        callback(xhr.response);
    };
    xhr.send();
}

function displayImage(blob){
    let objUrl = URL.createObjectURL(blob);
    let image = document.createElement('img');
    image.src = objUrl;
    document.body.appendChild(image);
}

loadAsset(imgUrl, 'blob', displayImage);
Promise
Promise是JavaScript中相对较新的功能,允许你推迟进一步的操作,直到上一个操作完成或响应其失败。
本质上,Promise是一个对象,代表操作的中间状态,它保证在未来可能返回某种结果。
- 创建promise时,它既不是成功也不是失败状态。这个状态叫作pending(待定)。
- 当promise返回时,称为 resolved(已解决)。
- 一个成功resolved的promise称为fullfilled(实现)。它返回一个值,可以通过将
.then()块链接到promise链的末尾来访问该值。.then()块中的执行程序函数将包含promise的返回值。 - 一个不成功resolved的promise被称为rejected(拒绝)了。它返回一个原因(reason),一条错误消息,说明为什么拒绝promise。可以通过将
.catch()块链接到promise链的末尾来访问此原因。
- 一个成功resolved的promise称为fullfilled(实现)。它返回一个值,可以通过将
Promise解决了回调函数的嵌套问题(callback hell),在用回调函数时,你的代码可能难以阅读, 而且每个嵌套都要调用相应的错误处理。
而使用Promise改良后,我们能够一个接一个地链接多个异步操作,因为每个.then()块返回一个新的promise,当所有.then()块链接完毕, 只需要一个.catch()块来处理所有错误。
Promise示例
使用fetch获取网上图片资源,并显示在页面中。
let imgUrl = "https://www.collinsdictionary.com/images/full/apple_158989157.jpg";

fetch(imgUrl).then(function(response){
    if(response.type == 'cors')
    {
        return response.blob();
    }
    else if(response.type == 'text'){
        return response.text();
    }
    else{
        throw new Error(`Type not correct, expect blob. returned ${response.type}`)
    }
    console.log(response.type);
})
.then(function(blob){
    let objectURL = URL.createObjectURL(blob);
    let image = document.createElement('img');
    image.src = objectURL;
    document.body.appendChild(image);
})
.catch(error => {
    console.log(error.message);
})
Promise的另一种写法
let imgUrl = "https://www.collinsdictionary.com/images/full/apple_158989157.jpg";

console.log('Starting...')
let promise = fetch(imgUrl);
console.log('Promise finish')
let promise2 = promise.then(response => {
    console.log('In promise 2')

    return response.blob();
})

let promise3 = promise2.then(blob => {
    console.log('In promise 3')
    let objUrl = URL.createObjectURL(blob);
    let image = document.createElement('img');
    image.src = objUrl;
    document.body.appendChild(image);
})
注意: 同步的
try...catch结构不可以和Promise一起使用。
async 和 await
async关键字和await关键字时最近添加到JavaScript语言里面的,它使得异步代码更易于编写和阅读。 把async关键字放在函数声明之前,使其成为异步函数。异步函数是一个知道怎样使用await关键字调用异步代码的函数。
我们使用异步函数和await关键字写个简单示例:
let hello = async function(){
    return greeting = await Promise.resolve("hello");
}

hello().then(function(message){
    console.log(message);
});
我们将Promise方法从网上资源获取图片,显示在页面上的代码用async和await关键字重新写一遍:
async function fetchImage()
{
    let imgUrl = "https://www.collinsdictionary.com/images/full/apple_158989157.jpg";
    let response = await fetch(imgUrl);
    let blob = await response.blob();
    let imageURL = URL.createObjectURL(blob);
    let image = document.createElement('img');
    image.src = imageURL;
    document.body.appendChild(image);
}

fetchImage().catch(error=> {
    console.log(error.message);
});
注意: 同步的
try...catch结构可以和async/await一起使用。
以上代码可以修改为:
async function fetchImage()
{
    try{
        let imgUrl = "https://www.collinsdictionary.com/images/full/apple_158989157.jpg";
        let response = await fetch(imgUrl);
        let blob = await response.blob();
        let imageURL = URL.createObjectURL(blob);
        let image = document.createElement('img');
        image.src = imageURL;
        document.body.appendChild(image);
    }
    catch(err)
    {
        console.log(err);
        console.log(err.message);
    }
    finally{
        console.log('finished');
    }
}

fetchImage();
浏览器API
常见的浏览器API包括: 操作文档的API, 从服务器获取数据的API, 用于绘制和操作图形的API, 音频和视频的API, 设备API。
操作文档的API: DOM (文档对象模型)API
在网页中, 你可以使用JavaScript来做很多事情,例如操作页面元素, 更新元素样式等。在JavaScript中,内置了以下对象来帮助你做事情:
- window对象,可以返回窗口的大小(window.innerWidth和window.innerHeight),为窗口绑定事件等。
- navigator对象,是浏览器存在于web上的状态和标识,可以用它获取一些信息,如地理位置,用户偏爱语言,多媒体流等。
- document对象,它是载入窗口的实际页面,你可以用这个对象来操作文档中的HTML元素和CSS样式。
window对象示例
在页面中创建一个div元素, 在窗口大小改变时,将div的宽高跟随window窗口一起变化。
let divSample = document.createElement('div');
divSample.style.backgroundColor = '#B0B0B0';
document.body.appendChild(divSample);

window.onresize = function(){
    let WIDTH = window.innerWidth;
    let HEIGHT = window.innerHeight;

    divSample.style.width = WIDTH + 'px';
    divSample.style.height = HEIGHT + 'px';
}
navigator对象示例
使用navigator.geolocation.getCurrentPosition获取当前的地理位置。
navigator.geolocation.getCurrentPosition(position => {
    let latitude = position.coords.latitude;
    let longitude = position.coords.longitude;
    console.log(`${position.coords.latitude}, ${position.coords.longitude}`);

    let image = document.createElement('img');
    image.src="http://maps.googleapis.com/maps/api/staticmap?center=" + latitude + "," + longitude + "&zoom=13&size=300x300&sensor=false";
    document.body.appendChild(image);
})
文档对象模型
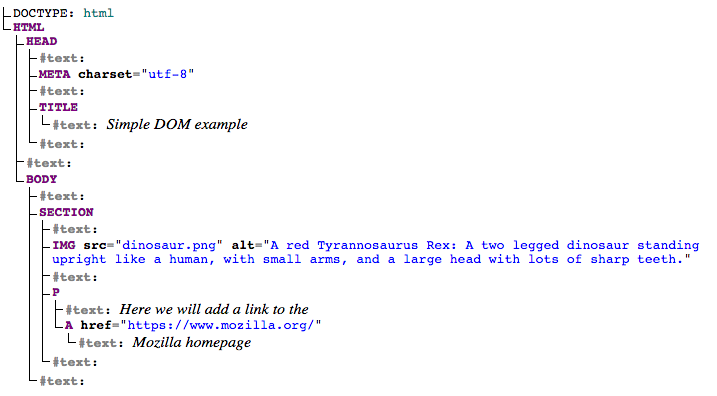
在浏览器标签中当前载入的文档用文档对象模型来表示,这是一个由浏览器生成的树结构。例如,
HTML源码如下:
<!DOCTYPE html>
<html>
  <head>
    <meta charset="utf-8">
    <title>Simple DOM example</title>
  </head>
  <body>
      <section>
        <img src="dinosaur.png" alt="A red Tyrannosaurus Rex: A two legged dinosaur standing upright like a human, with small arms, and a large head with lots of sharp teeth.">
        <p>Here we will add a link to the <a href="https://www.mozilla.org/">Mozilla homepage</a></p>
      </section>
  </body>
</html>
DOM树如下所示:

文档中每个元素和文本在树中都有它们自己的入口 — 称之为节点。你将用不同的术语来描述节点的类型和它们相对于其他节点的位置:
- 元素节点: 一个元素,存在于DOM中。
- 根节点: 树中顶层节点,在HTML的情况下,总是一个HTML节点(其他标记词汇,如SVG和定制XML将有不同的根元素)。
- 子节点: 直接位于另一个节点内的节点。例如上面例子中,IMG是SECTION的子节点。
- 后代节点: 位于另一个节点内任意位置的节点。例如 上面例子中,IMG是SECTION的子节点,也是一个后代节点。IMG不是BODY的子节点,因为它在树中低了BODY两级,但它是BODY的后代之一。
- 父节点: 里面有另一个节点的节点。例如上面的例子中BODY是SECTION的父节点。
- 兄弟节点: DOM树中位于同一等级的节点。例如上面例子中,IMG和P是兄弟。
- 文本节点: 包含文字串的节点
document对象示例
var link = document.querySelector('a'); // 选择器document.querySelector()选取元素的方法:标签 'a', 'p', 'img'; Id选择 '#btnAdd', '#tbName'; 类名选择 '.cls1', '.cls2'等。

console.log(link.text);
console.log(link.textContent);

console.log(link.href);

link.href="https://www.microsoft.com";
link.text="Microsoft Home page";
console.log(link.textContent);
console.log(link.href);


let newLink = document.createElement('a');
newLink.href = "http://www.baidu.com";
newLink.alt="A link to Baidu com.";
newLink.text="Baidu";
document.body.appendChild(newLink);
购物车示例
以下是一个复杂一点的示例,用户可以在输入框中输入内容,单击按钮,用户内容显示在列表中,然后将输入框中文本清空,焦点再次选中输入框。
let labelElement = document.createElement('label');
labelElement.text = "Enter a new item:";

let textBoxElement = document.createElement('input');
textBoxElement.type = "text";
textBoxElement.id = "tbInput";

let btnElement = document.createElement('input');
btnElement.type = "button";
btnElement.value = "Add item";
btnElement.id ="btnAdd";

let listElement = document.createElement('ul');

document.body.appendChild(labelElement);
document.body.appendChild(textBoxElement);
document.body.appendChild(btnElement);
document.body.appendChild(listElement);

document.querySelector('#btnAdd').addEventListener('click', function(){
    let text = document.querySelector('#tbInput').value;
    console.log(text);
    let liElement = document.createElement('li');
    let spanElement = document.createElement('span');
    spanElement.innerText = text;
    let rmBtnElement = document.createElement('input');
    rmBtnElement.type = "button";
    rmBtnElement.value = "Remove";
    rmBtnElement.addEventListener('click', function(){
        listElement.removeChild(liElement);
    }); // 列表中每个item右侧有个删除按钮,单击该按钮删除当前item
    liElement.appendChild(spanElement);
    liElement.appendChild(rmBtnElement);
    listElement.appendChild(liElement);
    document.querySelector('#tbInput').value = "";
    document.querySelector('#tbInput').focus(); //将输入框设为焦点控件
})
从服务器获取数据的两种方法:XMLHttpRequest和Fetch API.
在最初的页面加载模型中, 当你需要更新网页的任何部分时,都需要再一次加载整个页面。重新加载页面导致了耗时和不友好的用户体验,而Ajax技术解决了这个问题,从Ajax开始,允许网页请求小块数据(例如HTML, XML, JSON或纯文本)和仅在需要时更新它们的技术。
Asynchronous JavaScript and XML (Ajax), 这个名字起源于人们倾向于使用XMLHttpRequest来请求XML数据。然而今天,人们更倾向于使用XMLHttpRequest或Fetch来请求JSON格式的数据,Ajax这个名字仍然保留。
XMLHttpRequest(通常缩写为XHR)是一个古老的技术,它的优点是几乎支持所有的浏览器。Fetch API基本上是XHR的一个现代替代品,它是在比较新的浏览器中引入的。
XMLHttpRequest示例
let verseFile1Url = "https://raw.githubusercontent.com/mdn/learning-area/main/javascript/apis/fetching-data/verse1.txt";

let verseChoose = document.createElement('select');
let poemDisplay = document.createElement('pre');
for(let i = 1; i <= 3; i++)
{
    let option = document.createElement('option');
    option.innerText = 'verse'+i;
    verseChoose.appendChild(option);
}

document.body.appendChild(verseChoose);
document.body.appendChild(poemDisplay);

verseChoose.onchange = function(){
    let file = verseChoose.value;
    let url = verseFile1Url.replace("verse1", file);
    let xhr = new XMLHttpRequest();
    xhr.open('GET', url);
    xhr.responseType = "text"; //常用responseType有三种,分别是text, json, blob
    xhr.onload = function(){
        poemDisplay.textContent = xhr.response;
    }
    xhr.send();
}
Fetch API示例
let verseFile1Url = "https://raw.githubusercontent.com/mdn/learning-area/main/javascript/apis/fetching-data/verse1.txt";

let verseChoose = document.createElement('select');
let poemDisplay = document.createElement('pre');
for(let i = 1; i <= 3; i++)
{
    let option = document.createElement('option');
    option.innerText = 'verse'+i;
    verseChoose.appendChild(option);
}

document.body.appendChild(verseChoose);
document.body.appendChild(poemDisplay);

verseChoose.onchange = function(){
    let file = verseChoose.value;
    let url = verseFile1Url.replace("verse1", file);

    fetch(url).then(function(response){
        return response.text(); //根据responseType的不同,此处可以返回response.text(), response.blob(), response.json()
    })
    .then(function(text){
        poemDisplay.textContent = text;
    })
}
值得注意的是
fetch()返回一个promise, 它返回的响应将作为参数传递给.then()块进行处理。而response对象的text()方法也返回一个promise, 所以再使用.then()块对返回的文本进行处理。
获取Json数据示例
let jsonUrl = "https://mdn.github.io/learning-area/javascript/oojs/json/superheroes.json";

let btnTestJson = document.createElement('input');
btnTestJson.type="button";
btnTestJson.value="Get Json";
document.body.appendChild(btnTestJson);

let myJsonObj;
btnTestJson.addEventListener('click', function(){
    let xhr = new XMLHttpRequest();
    xhr.open('GET',jsonUrl);
    xhr.responseType = "json";
    xhr.onload = function(){
        let myJsonObj = xhr.response; //返回的Json对象
        console.log(myJsonObj);
        console.log(myJsonObj['homeTown']);
    }
    xhr.send();
})
注意,如果你在请求时responseType设成了text,那么需要将响应返回的字符串转换为Json对象,在JavaScript中可以使用
JSON.parse(text)方法将字符串转换为对象。 同时,JavaScript中的JSON.stringify(obj)可以将Json对象转换为字符串。